Functional API는 여러 개의 입력과 출력이 있는 모델을 포함하여 보다 유연한 모델을 구축할 때 사용하며 ResNet과 같이 순차적이지 않은 모델도 구축할 수 있다. 또한 Functional API에서는 모델 내부의 특정 레이어(layrer)에 접근하여 웨이트(weight)과 바이어스, 그리고 레이어의 입출력 텐서 등을 쉽게 추출할 수 있다.
만들고자 하는 CNN 모델은 Sequential API로 만든 것과 똑같다.
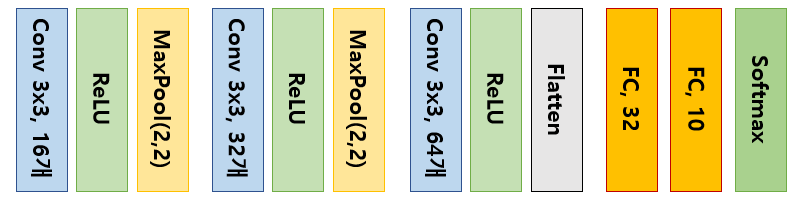
Functional API에서는 첫번째 레이어가 tf.keras.layers.Input 이어야 한다. 맨 마지막에 tf.keras.Model 을 호출하여 모델의 입력 레이어와 출력 레이어를 인수로 넣어주면 모델이 완성된다.
input_shape = (28,28,1)
img_input = tf.keras.layers.Input(shape=input_shape)
h = tf.keras.layers.Conv2D(kernel_size=(3,3), filters=16, activation='relu')(img_input)
h = tf.keras.layers.MaxPooling2D((2,2))(h)
h = tf.keras.layers.Conv2D(kernel_size=(3,3), filters=32, activation='relu')(h)
h = tf.keras.layers.MaxPooling2D((2,2))(h)
h = tf.keras.layers.Conv2D(kernel_size=(3,3), filters=64, activation='relu')(h)
h = tf.keras.layers.Flatten()(h)
h = tf.keras.layers.Dense(32, activation='relu')(h)
predictions = tf.keras.layers.Dense(10, activation='softmax')(h)

model = tf.keras.Model(inputs=img_input, outputs=predictions)
이 모델은 Sequential API로 만든 모델과 동일하다. 따라서 Functional API의 특징이 제대로 들어 나지는 않았다.
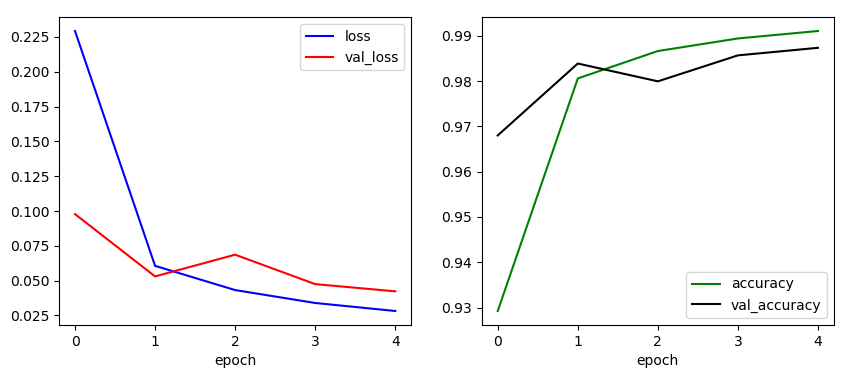
Functional ALI만의 고유한 특징이 드러나는 예제는 다음에 알아보기로 한다. 모델을 컴파일하고 전체 데이터를 5번 사용하여(에폭 5) 학습한 결과를 그림으로 그리면 다음과 같다.
전체 코드는 다음과 같다.
import tensorflow as tf
import matplotlib.pyplot as plt

# load mnist data
mnist = tf.keras.datasets.mnist
(x_train, y_train), (x_test, y_test) = mnist.load_data()

# adjusting to 0 ~ 1.0
x_train = x_train / 255.0
x_test = x_test / 255.0

print(x_train.shape, x_test.shape)

# reshaping
x_train = x_train.reshape(-1,28,28,1)
x_test = x_test.reshape(-1,28,28,1)

print(x_train.shape, x_test.shape)

# plotting
plt.figure()
for c in range(16):
    plt.subplot(4,4,c+1)
    plt.imshow(x_train[c].reshape(28,28), cmap='gray')
plt.show()

# model
input_shape = (28,28,1)
img_input = tf.keras.layers.Input(shape=input_shape)
h = tf.keras.layers.Conv2D(kernel_size=(3,3), filters=16, activation='relu')(img_input)
h = tf.keras.layers.MaxPooling2D((2,2))(h)
h = tf.keras.layers.Conv2D(kernel_size=(3,3), filters=32, activation='relu')(h)
h = tf.keras.layers.MaxPooling2D((2,2))(h)
h = tf.keras.layers.Conv2D(kernel_size=(3,3), filters=64, activation='relu')(h)
h = tf.keras.layers.Flatten()(h)
h = tf.keras.layers.Dense(32, activation='relu')(h)
predictions = tf.keras.layers.Dense(10, activation='softmax')(h)

model = tf.keras.Model(inputs=img_input, outputs=predictions)

model.summary()

# compile and train
model.compile(optimizer='adam',
              loss='sparse_categorical_crossentropy',
              metrics=['accuracy'])

history = model.fit(x_train, y_train, epochs=5, validation_split=0.25, verbose=2)

plt.figure(figsize=(10,4))
plt.subplot(1,2,1)
plt.plot(history.history['loss'], 'b-', label='loss')
plt.plot(history.history['val_loss'], 'r-', label='val_loss')
plt.xlabel('epoch')
plt.legend()

plt.subplot(1,2,2)
plt.plot(history.history['accuracy'], 'g-', label='accuracy')
plt.plot(history.history['val_accuracy'], 'k-', label='val_accuracy')
plt.xlabel('epoch')
plt.legend()

plt.show()

# model evaluate
test_loss, test_acc = model.evaluate(x_test, y_test, verbose=0)

print(test_loss, test_acc)
'프로그래밍 > TensorFlow2' 카테고리의 다른 글
| 텐서와 변수 - 2 (0) | 2021.02.10 |
|---|---|
| 텐서와 변수 - 1 (0) | 2021.02.09 |
| GradientTape로 간단한 CNN 학습하기 (0) | 2021.01.11 |
| Model Subclassing API로 간단한 CNN 구현해 보기 (0) | 2021.01.11 |
| Sequential API로 간단한 CNN 구현해 보기 (0) | 2020.07.17 |


댓글